Thursday, April 26, 2012

Health-ified Comfort Food

Josh and I both love pasta.  I could without a doubt eat pasta every day.  Pasta also happens to be quick to make and you can buy it and store it forever without it going bad.  I find that I waste so much food because I buy perishable items and then wind up having to throw them away if I don't cook them fast enough.  That's one of the problems I have with buying meat, I always wind up throwing some of it away.  But not pasta.  Pasta can just be stored in the pantry until you're ready for it. 

A couple of months ago Josh, Greg and I went to a local restaurant, Mother Kelly's.  It was a great family style Italian restaurant where the portions are too big and nothing is healthy.  Greg got fettucine alfredo, I had chicken parmesan and Josh ordered penne with vodka sauce.  I've never really liked vodka sauce because I never liked cream sauces, they were always too heavy.  However, this penne with vodka sauce was amazing.

The next day, after we finished our leftovers I was on the hunt for a non-heart attack inducing vodka sauce and I found one that didn't seem too bad. I made it a few days later and we all loved it.  Since then I've been trying to make it even healthier and the other night I think I succeeded.  The pasta still tasted great and had that home-y, heavy, unhealthy comforting feeling that you want to get from this pasta dish.  The only problem was that I was out of penne pasta - had to improvise with bowties!

I put the sauce into the weight watchers calculator and the entire recipe comes to 15 points. So, depending how many servings you get from this (we got 4, but we both had big servings), the sauce only comes to 4 points per serving.  Add that to your serving of pasta and a little parmesan cheese and it's a very do-able dinner! 

You can also add chicken to this dish, or veggies if you want.  Josh wants me to add chicken next time, but I think I'll only add it to half - I don't really like chicken in pasta dishes.

Bowtie Pasta with Vodka Sauce:
  • 1 tablespoon whipped butter
  • 1 medium shallot, minced
  • 2 cloves of garlic, minced
  • 1/2 teaspoon sea salt
  • 1/4 teaspoon black pepper
  • 2 tablespoons fresh parsley, minced (I didn't have fresh so I used about 1 teaspoon of dried)
  • 3 tablespoons canned tomato paste
  • 2 oz vodka (which I learned is 1/4 cup)
  • 1/2 cup light cream
  • 12 oz dry pasta
  • Parmesan cheese (optional)
First, get the pasta water up to boil.  The sauce comes together pretty quickly so if you start the water first the sauce and pasta should be done at the same time.  Don't forget to salt the water once it starts to boil - I realized it really does make a difference in flavoring the pasta!

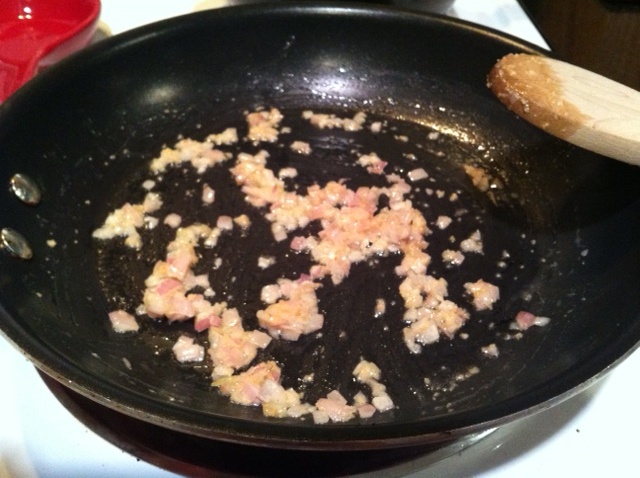
Next, chop up your shallot and garlic.  Melt the butter in a pan on medium heat.  Once melted, add the shallot and garlic and stir around until starting to caramelize, about 3 minutes.


Then, add the parsley, sea salt and pepper to the pan.  Stir to combine.  Add tomato paste and mix together with the garlic/shallot to combine.


Cook the tomato paste mixture for about 5 minutes, moving around the pan occasionally.    Add the vodka.  Scrap the bottom of the pan with a wooden spoon and cook for 5 more minutes.  The liquid will all evaporate during this time.  Add cream to tomato mixture.  You'll need to work it a little bit to get it combined.  You could use a whisk but I don't like to dirty more utensils than I have to, so I just used the wooden spoon.


Once combined, lower the heat and let simmer for about 3 minutes or until your pasta is ready.  Once pasta is done pour sauce over and combine.  Top with parmesan cheese.  Yum!

Tuesday, April 24, 2012

Everyone Deserves a Healthy Diet

Teddy had to go to the vet this morning.  For the past week or so we kept noticing that he just wasn't himself.  Normally he wants to run, jump, play fetch and tug-of-war.  Lately though, he just wants to lay on your lap and sleep (even though I love this - I know it's not like my puppy!) 


Also, for the past few weeks he's been "dribbling".  While he isn't 100% house trained yet, he's pretty good.  We walk him 3-4 times a day and this usually does the trick.  When he has to pee and we aren't taking him for a walk he has a wee-wee pad in the livingroom to use.  However, the past couple of weeks he's been squatting and peeing just a drop every 20-30 minutes or so wherever he wants - on the carpet, on the couch, on the bed.  Even when we walk him, he stops like 4 times to pee and very little comes out. 

Now, because I'm neurotic I kept looking up his "symptoms" online and a lot of sites said this is a phase, he was "marking his territory".  However, this past weekend he basically stopped eating.  He'd still eat treats and carrots and anything else we dropped on the floor, but he wouldn't eat his food.


Yesterday morning when I went to take him out of his crate, he had gone to the bathroom in his bed, stepped in it and made a big mess!  Teddy has never had an accident in his crate since we got him, so I knew that this wasn't normal and something was wrong. 

At this point enough was enough, we had to go to the vet. 

I called yesterday and got an appointment for this morning.  The vet said to feed him boiled white meat chicken and rice for dinner last night and breakfast this morning to see if he would eat that.  Well, that was no problem - he loved it.  But even after he ate, he was still so lethargic, not running around and playing at all.  Just laying on the couch.


This morning when we got to the vet they weighed Teddy (up to 8.2 lbs!), took his temperature and I explained to them his symptoms.  As soon as I started they suspected that he had a urinary tract infection which was causing the dribbling pee problem.  However, the UTI wouldn't entirely explain the upset tummy problems we've been having, causing him to not eat and have no energy.  They asked me what food I've been feeding Teddy.  I told them that I buy Vets Choice: Holistic Health Extension.  Well, apparently this was not a good thing!  They right away accounted for Teddy's upset stomach with this food.  I thought I was doing a good thing - feeding him all natural, organic dog food that has only 3 ingredients; chicken, chicken broth and brown rice.  The vet said that this has too much protein for Teddy and doesn't have any of the other nutrients that he needs.  She gave me a bag and some cans of Purina EN to give Teddy for the next couple of weeks, which she said would get his stomach back on track. 

By the time we left the vet (and $220 later) Teddy was put on 1 antibiotic, 1 stomach relaxer (she equated it to Pepcid for people) and 1 anti-bacterial. Hopefully in 5-7 days I'll have my normal, happy, frisky puppy back!


A note about the dog food:
The way I decided to feed Teddy Health Extension was by using this website that rates different dog food brands (wet and dry food), explains all of the ingredients and the benefits of the food.  It can be so overwhelming to choose a food at the pet store - there are so many!  I knew that I wanted a food for "pet stages" that I could use for him while he was a puppy and when he grows to be an adult.  We tried a couple different brands and this is the one that Teddy liked the best (they also had the smallest kibble size, which Teddy appreciated).

When I put Purina EN into the website I discovered that it only got 2 stars and the website says it's basically like feeding your dog McDonalds!  Well, I can't be feeding my puppy McDonalds every day!  What kind of mother would I be?  Especially when I'm trying to cook and eat healthy - doesn't Teddy deserve that as well?? 

I'm going to take the vets suggestion and feed him the Purina EN for a few weeks until his stomach is back on track and then I'm going to find a good, healthy food to feed to my precious baby.

Monday, April 23, 2012

Feeling Blue? Eat Some Greens!

Sunday is my normal "cook like crazy" day.  I usually go through recipes, make a list and go food shopping where I buy 3 times as much as I planned / needed.  Then I spend Sunday night prepping and cooking for the rest of the week. 

However, last night I just wasn't feeling it.  Between allergies, the rain and an adorable dog asleep on my lap, I didn't even get out of the apartment until 5pm and that was just to pick up a prescription and get my nails done (priorities).  And, because it was just one of those days, I was constantly snacking.  Because of this, when it came to dinner, Josh nor I were really feeling it.  All we wanted to do was snack on bad foods, have a couple drinks and watch Mad Men.

This is pretty much what we did, except for the snacking on bad foods.  I figured I could justify laying on the couch all night drinking wine as long as I ate something healthy.  But I didn't feel like cooking, so, to the freezer and fridge I went in search of healthy snack foods.

And what I came up with was:


I started with the kale and decided to make kale chips.  I simply tore off some of the thicker stems and spead the leaves onto a baking sheet.  I then sprayed the kale with the olive oil misto and sprinkled on some sea salt.  Then I threw them into a 500 degree oven for 5 minutes.  When they came out they were crispy and just starting to brown on the edges.  


While the kale was cooking I boiled some water and put in the edamame pods.  I left the pods to cook in the boiling water for about 6 minutes and then poured them into a colander to drain.  I then tossed them into a bowl with some sea salt.


Josh and I munched on these snacks while watching Mad Men, and actually finished both!  The kale chips were crispy and salty and the edamame tasted just like from the Japanese restaurant.  It was a guilt-free snacking spree.  Even Teddy liked the kale chips!

Friday, April 20, 2012

Yogurt...a Love / Hate Relationship

I've never really liked yogurt very much.  It's actually always been hard for me to get enough dairy into my diet.  I don't like yogurt and I don't like milk, the only dairy I really like is cheese and that has a lot of  fat so I try not to eat too much of it.

However, a couple years ago I discovered Greek yogurt and my world changed.  Finally, I found a yogurt I liked!  However, there is only one way that I like it.  I buy the plain non-fat Greek yogurt and mix in 1 splenda, cinnamon, blueberries and 2 tablespoons of granola.  I probably eat this 2 times a week or so, either for breakfast or for a light lunch and the weight watchers point value comes out to only 4 points for the whole thing.

A couple of weeks ago when food shopping I was picking up my few containers of Chobani plain yogurt and I saw that they had a new flavor - apple cinnamon.  I decided to give it a try.


Turns out, this flavor is AMAZING.  This variety is non-fat as well but the point value for the yogurt is 3 points, instead of the plain which is 2 points.  Most people would be fine with that because you'd just eat the yogurt.  However, I need crunch.  That was always my problem with yogurt - it's just so blah because there is no texture.  That's why I always add granola and blueberries to the plain yogurt, to give it some added textures.  For my first couple containers of this new yogurt I still added my 2 tablespoons of granola, but then the point value for the whole thing went up to 5 points.  I wanted to figure out a way to keep it at 4 points. 

Enter Fiber One 80-Calorie cereal.  I bought this cereal a couple of weeks ago and wasn't too impressed.  If you doctor it up enough with bananas and cinnamon it's OK for breakfast, but I just wasn't a huge fan.  However, mixed in with this yogurt it is a perfect accompaniment!  The cereal has 2 points in 3/4 cups, so I've been measuring out 1/4 cup of the cereal into small containers and bringing them to work with me to add to the yogurt. 


I also add just a little extra cinnamon to the yogurt since I really like cinnamon.  This makes a very satisfying and light breakfast, and it is only 4 points!


Tuesday, April 17, 2012

Light Dinner for a Hot Day

Yesterday was hot.  Like, kinda crazy hot.  I had made a lasagna Sunday night that I was planning to serve for dinner last night, but the idea of hot heavy lasagna after such a hot day just wasn't very appetizing.

Instead, I decided to make a quick pasta dish that I made once before and both Josh and I really liked it.  It's easy and fast to make - necessities for weeknight dinners since I get home so late and we're both so hungry.

Pasta with Asparagus:
  • 1 pound asparagus cut into 1 inch pieces
  • 8 ounces pasta 
  • 1 tablespoon whipped butter
  • 1 tablespoon olive oil (divided)
  • 4 cloves of garlic
  • 1/4 teaspoon crushed red pepper flakes (or more if you like it hot - I don't, I'm a wuss)
  • salt & pepper to taste
  • 1/4 cup parmesan cheese (divided)
First, get the water boiling for your pasta.  I normally use whole wheat pasta but last night I tried the Ronzoni Smart Taste.  It tastes like white pasta but has added fiber - both Josh and I really liked it!  I just had to be careful because this box is 12 oz, not 16 oz like a normal box of pasta.  I cooked the whole box but only used 2/3 for this recipe.


Next you're going to want to wash, dry and trim your asparagus.  Then cut into 1 inch pieces.


Get a pan on the stove on medium heat.  Melt the whipped butter with 1/2 tablespoon olive oil.  Once melted, add in the garlic and red pepper flakes.  Stir that for a minute or so until you can start to smell it.  Then add the asparagus, salt & pepper and stir to coat.


At this point my water was boiled so I dropped my pasta.  The box said for al dente to cook for 10 minutes so I set my timer (because Josh and I really like the pasta al dente and not overcooked), which was perfect because the asparagus took 10 minutes to cook as well.  You want to cook it until it's just tender.  Take the asparagus off the heat and add your cooked pasta.  Add the other 1/2 tablespoon of olive oil, 1/8 cup of parmesan and stir it all together!
picture shows about half the pasta - I forgot to get a picture before I served the first bowl

Divide the remaining 1/8 cup parmesan cheese among the bowls.


This was delicious and filling, but light at the same time. 

Now that I'm trying to follow weight watchers a little more I decided to put this recipe into their recipe builder.  The total recipe as listed comes to 27 points, so depending how many servings you get from it (we got 3) it is even a point friendly meal - definitely worth the 9 points!

Monday, April 16, 2012

A Weekend In The Life of Teddy

This past weekend was really the first nice weekend of the year.  Not only was it warm, but no rain (and allergy medication means no more sneezing and headaches)!  We decided to take advantage of the great weather and do outdoor things with Teddy.

On Saturday Greg and I went to Long Beach with Teddy.  It was Teddy's first time at a beach so I wasn't sure how he was going to react.  Turns out, he LOVED it.  He loved running in the sand and putting his paws in the water.


After some fun in the sand, we walked along the boardwalk and enjoyed the view.

On Sunday Josh and I decided to take Teddy to a dog park for the first time.   I really didn't know how this was going to go because Teddy has been very afraid of all dogs.  When we were in our puppy education class he was even afraid of the little puppy Maltese and Chihuahua!  That's one of the reasons I put him in doggie day care.  I want him to socialize and get used to being around other dogs.  We chose this dog park in particular (in East Rockaway) because it has separate areas for big dogs and little dogs.  When we got there Teddy seemed to be doing OK.  He sniffed and let other dogs sniff him, which is a pretty big step for him.  However, after about 10 minutes he was obviously upset and didn't want to be there.  He wouldn't play fetch with Josh, drink his water or eat his treats (I brought enough to share with the new friends I was hoping he'd make)!  The dog park wasn't a total waste though - there was actually another King Charles Cavalier there!  The other King Charles, Charlie, was about 3 times the size of Teddy and he was only 5 months old (1 1/2 months younger than Teddy!). 

Teddy on the left and Charlie on the right (Josh in the middle)


After we left the dog park Teddy was back to his tail-wagging self.  Once at home though, both Teddy and I were exhausted from all of our weekend fun!

Sunday, April 15, 2012

Overcoming My Bread-Making Fear

I made bread!  I keep finding bread recipes that I want to try, but I've just been too scared.  I'm not sure why, it just seems so daunting... the idea of making bread (without a bread machine).  Finally though, I found a recipe that I just couldn't pass up.  Kalamata Olive Bread.  Is there anything more beautiful sounding?  I love olives, and I think Josh is the only person I've met who actually likes olives more than me.  This bread was made for us. 

Kalamata Olive Bread:
  • 3 cups bread flour
  • 2 teaspoons active dry yeast
  • 2 tablespoons white sugar
  • 1 teaspoon salt
  • 1/2 cup chopped kalamata olives
  • 3 tablespoons olive oil
  • 1 1/4 cups warm water
  • 1/2 teaspoon rosemary (divided)
  • 1/4 teaspoon kosher salt for sprinkling on dough
  • 1 tablespoon cornmeal

This bread really couldn't be easier to make.  You're just going to mix together the flour, yeast, sugar, 1 teaspoon salt, olives, olive oil, water and 1/4 teaspoon rosemary in the bowl of your mixer. 

Then, just take off the mixing attachment and put on the kneader!  Let 'er rip for 10 minutes, until it looks smooth.


Now you're going to let the dough rise for the first time (there are a total of 3 rising times for this bread).  Set it aside and let it rise for about 45 minutes until it doubles in size.


After the dough has risen, turn back on the kneader for 10 minutes.  Then set aside again and let it rise for about 30 minutes, until it doubles in size again.

Now you're going to want to grease (I used the misto with extra virgin olive oil) a medium size bowl and dump the dough into the bowl.


Let it sit in the bowl until it doubles in size again.  Meanwhile, while it's rising for the last time, preheat your oven to 500 degrees and set a baking sheet with water on the bottom rack.  It took about the same amount of time for my oven to preheat and the bread to rise, which worked out well.  While these two things are happening you should get your baking sheet ready.  You'll want to spray the baking sheet (again, I used my misto - although you could use Pam) and then dust with cornmeal.  Once the dough has doubled in size for the third time, gently turn the dough out onto your prepared baking sheet.


At this point you could shape it however you want.  I sorta just turned the dough out and didn't touch it.  It's a pretty sticky dough so if you're going to play around with the shape you'll want to put some flour on your hands.  I sprayed the top of my loaf with the misto and then sprinkled more rosemary and some kosher salt.  This made for a golden brown crust with a salty crunch.

You're going to bake the bread at 500 for 15 minutes and then reduce the heat to 375 and bake for an additional 30 minutes.  You may have to adjust the cooking time if you change the shape.


Let the bread cool completely before eating it.  We were so excited to try it that I cut into it right away and the inside was still soft and tasted dough-y. 

However, this morning for breakfast I decided to try it toasted with butter and it was amazing.  Josh and I may or may not have eaten half the loaf...


I think I've officially overcome my fear of bread making. Who knows what my bread-making future may hold (Josh has requested focaccia next)!

Thursday, April 12, 2012

Healthy Meal from an Empty Fridge

It's gotten bad.  I'm at the point of no return.  I really need to lose weight.  I know everyone says that, but seriously, I have a problem.  A few months ago I joined weight watchers in hopes of losing weight, and I think I've actually gained weight since then! (I wouldn't know for sure since I haven't gone to get weighed in since I joined...)  That is all about to change though.  For real this time.  I'm going to lose weight!

So, now it's not just about eating healthy, but correct portion sizes too.  That's my main problem.  Even though I cook healthy, who really eats the correct portion?  Did you know there are 8 servings in a box of pasta.  Honestly, who gets 8 servings in a box of pasta?! Josh and I probably get 3 or MAYBE 4.  Whoops.

Anyway, in attempts to eat a very low calorie dinner last night (and the fact that I haven't been food shopping in almost 2 weeks so it's slim pickins'), I grabbed 2 of the vegetables we had and attempted to make something of it!

Spaghetti Squash and Roasted Broccoli Boat:
  • 1 spaghetti squash
  • 1 bag frozen (or 1 head fresh) broccoli
  • 1 tablespoon extra virgin olive oil
  • 2 cloves garlic, minced
  • salt & pepper
  • Parmesan cheese
First, I cut the spaghetti squash in half length wise (hardest part of the whole meal!), scraped out the seeds, seasoned it with salt and pepper and put it in a glass dish with about an inch of water and microwaved it for 16 minutes.

While the squash was in the microwave I opened up a bag of frozen broccoli (which I buy for emergencies such as this), which had been defrosting in the fridge all day.  I put it in a colander to drain out the water and then put it on a foil lined baking sheet.  I sprayed it with a bit of olive oil (using the misto), added the garlic, salt & pepper and mixed it all up.  I then put it in a 450 degree oven for about 20 minutes, until it was roasted and golden.

Once the squash was done, I let it cool for a few minutes until I could handle it.   Then, I scraped out the insides with a fork.  If you haven't had spaghetti squash the cool thing about it is that when you scrape it out, it comes out in strands like spaghetti.  Josh and I love it.  I normally like it with soy meatballs and parmesan cheese, and Josh usually just eats it with tomato sauce. 

I then combined the broccoli and spaghetti squash in a large bowl and added the 1 tablespoon of olive oil, about 1/4 cup of parmesan cheese and more salt and pepper.  Then I put it back in back in the empty squash halves to make it look fancy. 


Voila, quick and healthy dinner!

Tuesday, April 10, 2012

Doggie Daycare Woes & Rewards

Normally Josh and my schedules work pretty well in terms of taking care of Teddy.  Josh is out of the house early - before I'm even up, so when I get up I walk Teddy, feed him, play with him a bit and then he hangs out with me while I'm getting ready for work.  I leave the house around 8:15am, so at that point I put him in his playpen with plenty of toys, a bowl of water and a couple of teething treats.  Josh is usually home around 4pm or so from the hospital, so he'll take Teddy out, walk him and play with him for awhile.  A few hours later Josh either goes to the gym or to the library and is home by 7pm, which is when I get home.  At that point one of us feeds Teddy his dinner and then I get started on dinner for us.

However, every 4 workdays Josh is now on call at the hospital.  This means that he basically has to stay until the residents say he can leave.  Sometimes he gets out at 5pm and sometimes it's 9pm (at least it's not overnight like in surgery!).  Anyway, on these days I have to put Teddy in doggie day care since there's a chance that I'll be the first one home at 7pm, and Teddy can't be in his pen for 11 hours straight.  There's a cute doggie day care that we use that's right by the train so it works out well.

Yesterday I dropped Teddy off at day care around 8am.  Teddy was not happy about this.  It broke my heart hearing his little whimpers and seeing his big sad eyes.  However, I pried myself away in time to make my train, knowing that I would see him when I got home from work.  The dogs at daycare need to be picked up by 7pm.  My normal train gets me to the train station near the day care by about 6:40, but of course, the train was delayed yesterday.  I called the daycare to let them know, and they said my poor little baby was the only one left to be picked up!   I wound up getting to the daycare at EXACTLY 7pm.  Teddy was very excited to see me, and very happy to leave daycare.  I felt so awful that he was the last one there - it brought back memories to grade school when your parents would be running late and the teacher had to stay with you until they got there. 

When we got home I decided to bake Teddy some home-made all natural doggie biscuits to make up for the day (and some roasted chicken didn't hurt either).  Teddy has since forgiven and forgotten the whole day and is back to his usual happy self.


Whole Wheat Doggie Biscuits:

  • 1 cup old fashion oatmeal
  • 1 stick margarine
  • 1 teaspoon chicken or beef bouillon
  • 1 1/2 cups hot water
  • 3/4 cup powdered milk
  • 3/4 cup corn meal
  • 1 egg
  • 3 cups whole wheat flour
First, combine the oatmeal, margarine and bouillon in a bowl and add the 1 cup hot water.  Let the ingredients sit for 5 minutes.  Next, powdered milk, corn meal and egg.  Mix ingredients together and start adding the flour, 1/2 cup at a time, mixing completely each time.  Once all the flour has been added, knead dough for 3-4 minutes.  At the end you're going to want a firm dough, so you may need to add some more flour depending how sticky your dough is.  (I did this whole recipe in my kitchen aide mixer, so I was able to add the flour while the mixer went to work and then just change to the kneading attachment to knead the dough).  After the dough has come together, roll into a  disc about a 1/2" thick.  Using a cute doggie cookie cutter, cut the biscuits and place them on a foil lined and greased tray.  Bake treats at 300 degrees for about 50 minutes.  They should be hard and crisp.  Make sure you wait for them to cool before you give them to your four-legged children (Teddy did NOT want to wait - I had to break one up and blow on it for him).


As a side note, these are completely edible and natural.  You could eat them too if you wanted!  Josh tried one... he said it tasted like whole wheat pizza crust.

Monday, April 9, 2012

Passover Brunch: Matzo Brie

What else is a good Jew to do the morning after Passover beings?  Make matzo brie of course!

When Josh and I woke up Saturday morning I already had matzo brie on my mind.  Matzo brie is basically french toast, but with matzo instead of bread.  This was my first attempt at trying to lighten up the traditional matzo brie and it came out great!

Matzo Brie (for 2 people):
  • 3 pieces of matzo
  • 1 whole egg plus 1 egg white
  • 1/2 teaspoon salt
  • 1/4 teaspoon cinnamon
  • 1 tablespoon brown sugar
  • 1 tablespoon white sugar
  • 1 tablespoon light butter (could also use canola oil)
First, you're going to break up the matzo into pieces and put in a bowl.  Then, you'll want to fill the bowl with hot water just to cover the matzo (I put a bowl on top to keep the matzo submerged under the water) for about 5 minutes.  After 5 minutes drain the water out.  You'll be left with soggy torn up matzo; which is exactly what you want.


Next, whisk the egg plus egg white right in the bowl you used to keep the matzo submerged in the water (remember, the less dishes dirtied the better!) and add the salt and cinnamon.  Combine the egg mixture into the matzo and add the sugar.  Stir until combined.  


Melt the butter in a pan on medium heat.  Once melted, pour the mixture into the pan and do not touch it for 5 minutes.


After 5 minutes you need to flip it.  This is tricky.  I found the easiest way was to take a spatula and cut the matzo brie down the middle and flip each half separately.  It doesn't really matter if it all falls apart because I mix it up and serve it like that anyway. You'll want to cook it for about another 5 minutes, or until it seems all the egg has cooked and the matzo is browned.  Then, serve however you'd like: I like mine with sprinkled sugar, Josh likes his with a little sugar and salt.  You could also put powdered sugar, maple syrup, jam or cut up fruit.  Basically, anything goes!


Enjoy!

Sunday, April 8, 2012

Matzo Brittle

Note:  After I posted this I found a recipe for the matzo crunch on weightwatchers.  Their recipe is obviously healthier (only 1/3 cup sugar and butter) - but does it taste as good?  Probably not :)

What a weekend!  It started off with a Passover sedar at Josh's parents house on Friday night, and then on Saturday we headed to NJ for my family's sedar. 

Josh's mom is a fantastic cook, so I knew the food would be great, but I always like to bring something anyway (in addition to the kosher for passover wine that we found from the vineyard that we visited in Israel!).  I figured I'd bring something little, a snacky-snack to add to whatever she made for dessert.  I had come across a recipe for saltine cracker crunch, and figured, why can't I substitute matzo?  It was sort of an experiment, but it came out great!  I brought the leftovers to my house and they were gone in about 2 minutes (mostly by my dad).  I even made another batch while I was at my parents house for my mom to bring to work (and my dad to eat...)

WARNING - this recipe is in no way healthy, but it is kosher for passover, so I figure that's just as good.

Matzo Brittle:
  • ~4 sheets of matzo
  • 1 cup of salted butter, cut into a couple of large pieces (if you only have unsalted butter, add 1/2 teaspoon of salt to the recipe)
  • 1 cup of packed brown sugar
  • 1/2 teaspoon vanilla extract
  • 1 1/2 cup chocolate chips
  • nuts or other toppings (optional) 


First, if you're anything like me you hate doing dishes.  In order to avoid washing a very sticky cookie tray, cover the entire tray in tin foil and then line with parchment paper.  Then, cover the parchment paper with matzo.  You'll need to break up the matzo to have it fit, so don't worry about using those broken pieces from the bottom of the box!


Next, preheat your oven to 300 degrees.  In a small saucepan combine the 1 cup butter with the 1 cup brown sugar.  Place over medium heat and wait for the butter to melt with the sugar.


Once completely melted, wait for the mixture to start boiling.  Once boiling, stir for about 3 more minutes, or until the caramel seems thickened.  Make sure to stir constantly so the bottom doesn't burn.


Once the caramel seems thick, take it off the heat and add the vanilla (and salt if you used unsalted butter).  Then pour over the matzo, and spread around to cover the matzo completely.  You'll want to work quickly since it will start to set.  After the caramel is completely covering the matzo, put the tray in the oven for 15 minutes.  I set the timer for every 5 minutes so I would remember to keep checking it.  If the caramel starts bubbling too much you'll want to open the door a little to drop the temperature. 


After 15 minutes remove the tray and pour the chocolate chips over the caramel.  You'll use about half a bag of chocolate chips (or more if you want a lot of chocolate!).  Wait about 5 minutes for the chocolate chips to get melty and then spread them over the entire caramel covered matzo.  At this point you can also add some chopped nuts, marshmallows, sea salt or any other topping you'd like.


You can either leave it out on the counter to harden, or put the tray in the fridge to hurry up the process (obviously what I did - Josh and I couldn't wait to try this!).  Once it's completely hardened just take a knife and cut up the sheets any way you'd like.  I like mine to look rustic :)


This is a very quick and easy snack to leave out for people to munch on or to send home with people (just put in little cellophane bags and tie with a cute ribbon).  However you choose to share these, they'll be sure to be a hit!


Friday, April 6, 2012

Happy Passover!

May your Passover be filled with matzo balls, matzo brie and matzo brittle!

I made the matzo brittle last night and intend to make the matzo brie tomorrow morning for brunch.  Pictures and recipes to come soon!

For now, Teddy is in his kippa and ready for the Sedar!

Wednesday, April 4, 2012

Tofu... it's what's for dinner!

I never liked tofu.  In fact, I hated it.  My mom cooks it all the time and I would never even try it.  I think I tried it ONCE and it was mushy and I then decided I hated it and would never eat it again.

This all changed a couple weeks ago when Josh and I went out to lunch with some friends at a Thai restaurant.  Josh and I decided to share an appetizer and he suggested the fried tofu.  Now, I didn't like tofu but I DO like fried food, so I figured I'd give it a try.  I was surprised, it was actually really good!  Not mushy at all, and it was a very clean flavor that went well with the dipping sauce.  Plus, tofu is so low in calories and high in protein that I figured it cancelled out the fried part. I can get on board with this!

For the past couple weeks I've been experimenting with tofu dishes.  I obviously do not want to deep fry my tofu, but I still want that crispy outside, and I think I finally figured out how to get it.  Firstly, you have to make sure that you buy the EXTRA FIRM tofu.


Next, when you take it out of the package you need to press it in between paper towels to get out all of the moisture (which is what turns to mush when cooking).  Once the paper towels aren't getting out any more liquid you'll want to dice the tofu.  Then lay all the cubes on another paper towel to take out more liquid (since the paper towel will now reach more surface area).  Once on the paper towel, be sure to salt and pepper the tofu cubes.


While that's happening,  put 1 tablespoon of cornstarch, 1 tablespoon of flour, salt and pepper in a plastic bag and shake to combine.  Add the tofu cubes and seal the bag.  Shake it up so that all the cubes are coated with the flour/cornstarch mixture.  The tofu is finally ready to be cooked.  Heat 1 tablespoon of canola oil (don't use extra virgin olive oil - it gave it a funny taste) in a pan. Once the oil ripples, start adding the cubes of tofu.  Once in, don't move them.  After a couple minutes check one to make sure it is getting golden brown on the bottom.


If it is, go ahead and flip all of them.  You'll want to repeat this until all the sides are browned (I cheated at this point and started just shaking them up in the pan - once 2 sides are browned they are firm and will stay together even if you shake them up).  The total cooking time took about 7 minutes.  Once they are golden all over remove them to a small bowl and continue cooking the rest of your dinner. 

Last nights dinner was sweet and sour tofu.  I LOVE sweet and sour chicken from chinese restaurants, but it is perhaps the worst thing ever for you.  I was pretty sure it wouldn't taste nearly as good at home, but surprisingly, both Josh and I loved it!  Josh even took the leftovers for lunch today :)

To make the Sweet and Sour Tofu:

1. "Fry" up your tofu.  Set aside.

2. You'll want to stir-fry up some veggies.  I bought a bag of frozen veggies called "Asian Stir Fry", which had peppers, carrots, onions, broccoli and green beans.  I also added a can of chopped water chestnuts.


You could obviously use fresh veggies, but this was a huge time saver for me.  Once veggies are stir fried, take them out of the pan and set aside in colander to drain out the liquid.

3.  In the same pan that you fried up your tofu and stir fried your veggies in (I hate doing dishes so I re-use pans in the same meal!) start assembling your sweet and sour sauce:
  •  4 oz. pineapple juice (I bought an 8 oz can of cubed pineapple in juice and saved the chunks to add to my cottage cheese!)
  • 1/8 cup ketchup
  • 1/8 cup brown sugar
  • 1/8 cup white vinegar
  • 3/4 tablespoon cornstarch
  • 1/4 teaspoon granulated garlic
  • 1/8 teaspoon mustard powder or ground mustard
  • 1/2 tablespoon Worcestershire sauce
  • 1/4 teaspoon ginger juice or powder
  • red pepper flakes (I didn't add these last night since I don't like spicy food, but I think I'll add a little bit next time)
Combine all ingredients in the pan and whisk together.  Once combined, turn pan to medium heat and heat until it thickens.  This takes about 3 minutes.  Once it starts to thicken add in the tofu and veggies and stir to coat.   Turn the heat to low to just heat the tofu and veggies through.


 Serve over brown rice and enjoy!